Processing math: 100%

Friday, 15 November 2019

My Matplotlib Cheatsheet (#1)

I find myself Googling the same matplotlib/pyplot queries over and over again. To make life easy, I started collecting some of them in a series of blog posts.
In this first post, I'll look at subplots and annotations.

Turn off axes


We can remove axes, ticks, borders, etc. with ax.axis('off'). This can be used to remove unnecessary subplots created with the subplots function from pyplot, for instance, when we only want to use the upper triangle of the grid. Here's an example:

import matplotlib.pyplot as plt
import numpy as np
import scipy.stats as sts
## create some random data
n = 3
Sigma = sts.wishart.rvs(scale=np.eye(n), df=n)
xs = sts.multivariate_normal.rvs(cov=Sigma, size=1000)
## plot histograms and scatter plots
fig, axs = plt.subplots(n, n, figsize=(7,7))
for i in range(n):
for j in range(n):
if i > j:
axs[i, j].axis('off')
elif i == j:
axs[i, j].hist(xs[:, i], density=True)
else:
axs[i, j].scatter(xs[:, i], xs[:, j], s=5)
fig.tight_layout()
fig.savefig("axis-off.png", bbox_inches='tight', dpi=200)
view raw axis-off.py hosted with ❤ by GitHub

The result is:


Share axes between subplots after plotting


An alternative way of making a ragged array of subplots makes use of gridspec. The problem here is that it is a bit more difficult to share x and y axes. Of course add_subplot has keyword arguments sharex and sharey, but then we have to distinguish between the first and subsequent subplots. A better solution is the get_shared_x_axes() method. Here's an example:

import matplotlib.pyplot as plt
import numpy as np
from matplotlib.gridspec import GridSpec
## we want to make 23 plots using 5 columns
n = 23
ncols = 5
## compute the required number of rows:
nrows = n // ncols + 1 if n % ncols else 0
## use gridspec to make the subplots
fig = plt.figure(figsize=(7,7))
gs = GridSpec(nrows, ncols)
## reduce space between the subplots
gs.update(wspace=0.07, hspace=0.07)
## list will contain the subplots
axs = []
## some parameters for making our data
u, v = 0.2, 0.3
ts = np.linspace(0, 2*np.pi, 100)
for i in range(n):
## compute the row and column index
col, row = i % ncols, i // ncols
## and use gridspec to get a new subplot
ax = fig.add_subplot(gs[row, col])
## create some data and plot
xs = (1+row) * (np.sin((col+1) * ts) + u * np.sin(ts))
ys = (1+col) * (np.cos((row+1) * ts) + v * np.sin(ts))
ax.plot(xs, ys, linewidth=3)
## add the new subplot to the list
axs.append(ax)
## make y axis invisible
if col > 0:
ax.get_yaxis().set_visible(False)
## make x axis invisible
if row > 0:
ax.get_xaxis().set_visible(False)
else: ## move the x-ticks to the top
ax.xaxis.set_ticks_position('top')
## now we make the x and y axes shared and auto scale them
axs[0].get_shared_x_axes().join(*axs)
axs[0].autoscale(axis='x')
axs[0].get_shared_y_axes().join(*axs)
axs[0].autoscale(axis='y')
fig.savefig("distorted-lissajous.png", bbox_inches='tight', dpi=200)
view raw share-axes.py hosted with ❤ by GitHub

The result is:

Hybrid (or blended) transforms for annotations


When you annotate a point in a plot, the location of the text is often relative to the data in one coordinate, but relative to the axis (e.g. in the middle) in the other. I used to do this with inverse transforms, but it turns out that there is a better way: the blended_transform_factory function from matplotlib.transforms.
Suppose that I want to annotate three points in three subplots. The arrows should point to these three points, and I want the text to be located above the point, but the text in the 3 subplots has to be vertically aligned.


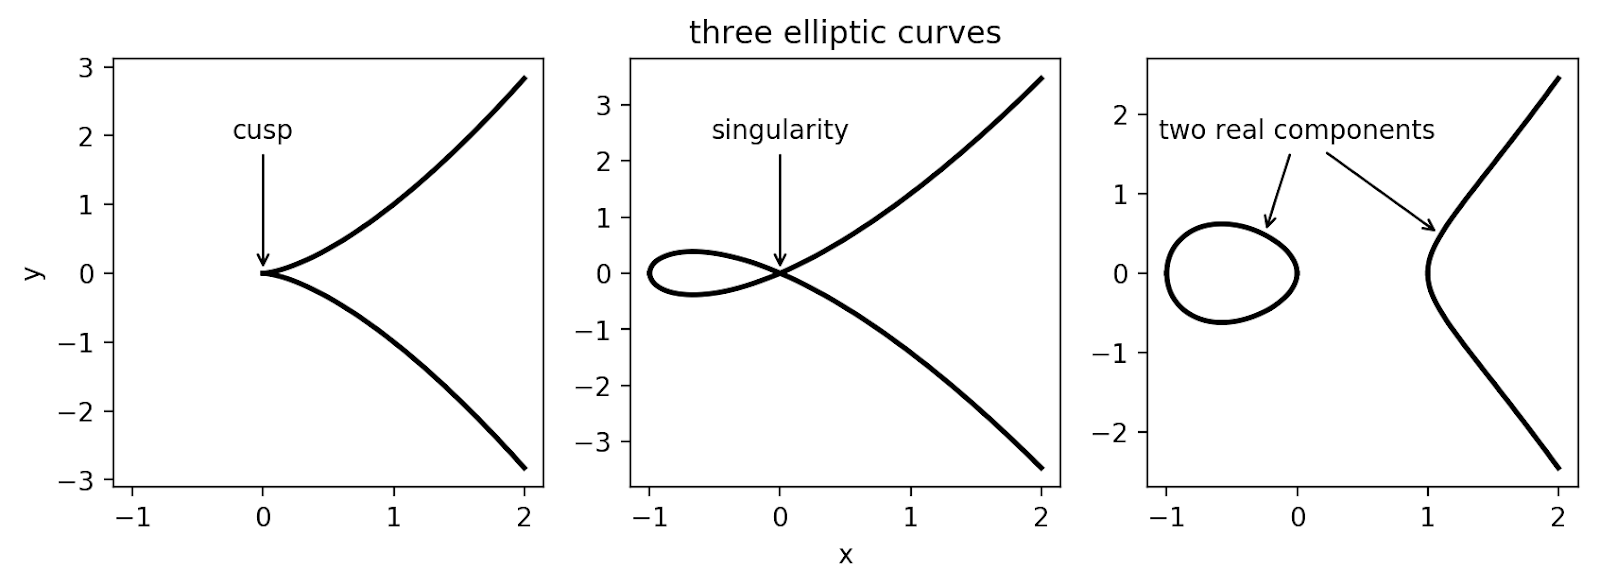
Notice that the y-axes are not shared between the subplots! To accomplish the alignment, we have to use the annotate method with a custom transform.

import matplotlib.pyplot as plt
import numpy as np
## import the function we'll need for making the transforms
from matplotlib.transforms import blended_transform_factory
fig, axs = plt.subplots(1, 3, figsize=(10,3), sharex=True)
fs = [
lambda x: np.sqrt(x**3),
lambda x: np.sqrt(x**2*(x+1)),
lambda x: np.sqrt((x+1)*x*(x-1))
]
## plot some elliptic curves (the real part at least)
xs = np.linspace(-1, 2, 1000)
for f, a in zip(fs, axs):
a.plot(xs, f(xs), color='k', linewidth=2)
a.plot(xs, -f(xs), color='k', linewidth=2)
def hybrid_trans(ax):
"""
This function returns a blended/hybrid
transformation w.r.t. subplot ax.
x-coord: use the data for positioning
y-coord: use relative position w.r.t y-axis
"""
return blended_transform_factory(ax.transData, ax.transAxes)
## avoid repetition: common key-word arguments for annotate
kwargs = {
"arrowprops" : {"arrowstyle": "->"},
"ha" : "center",
"va" : "bottom"
}
## give subplots names to avoid indexing
ax, bx, cx = axs
## the argument xytext determines where the text is positioned,
## and we can pass a transformation with textcoords.
## we'll use our custom "hybrid" transform so that the x-coord
## corresponds to the data, and the y-coord is relative.
ax.annotate("cusp", xy=(0,0), xytext=(0, 0.8),
textcoords=hybrid_trans(ax), **kwargs)
bx.annotate("singularity", xy=(0,0), xytext=(0, 0.8),
textcoords=hybrid_trans(bx), **kwargs)
## this is a bit of a hack: I want two annotate two points
## with one text box. I'll make the second text box invisible
## by setting alpha=0
text = "two real components"
xcoords = [-0.25, 1.1]
alphas = [1, 0]
for x, alpha in zip(xcoords, alphas):
## use fs[2] to get the correct point
cx.annotate(text, xy=(x,fs[2](x)), xytext=(0,0.8), alpha=alpha,
textcoords=hybrid_trans(cx), **kwargs)
## add some labels and titles...
bx.set_xlabel("x")
ax.set_ylabel("y")
bx.set_title("three elliptic curves")
fig.savefig("annotations.png", bbox_inches='tight', dpi=200)

Monday, 11 November 2019

Using constant Stan functions for parameter array indices in ODE models


Stan's ODE solver has a fixed signature. The state, parameters and data has to be given as arrays. This can get confusing during development of a model, since parameters can change to constants (i.e. data), the number of parameters can change and even the state variables could change. Errors can easily creep in since the user has to correctly change all indices in the ODE function, and in (e.g.) the model block. A nice way to solve this is using constant functions. Constants in Stan are functions without an argument that return the constant value. For instance pi() returns 3.14159265... The user can define such constants in the functions block. Suppose that we want to fit the Lotka-Volterra model to data. The system of ODEs is given by dxdt=axbxy,dydt=cbxydy and so we have a 2-dimenional state, and we need a parameter vector of length 4. In the function block, we will define a function int idx_a() { return 1; } that returns the index of the parameter a in the parameter vector, and we define similar functions for the other parameters. The full model can be implemented in Stan as shown below. The data Preys and Predators is assumed to be Poisson-distributed with mean Kx and Ky, respectively, for some large constant K. I fitted the model to some randomly generated data, which resulted in figure above.

functions {
// parameter indices
int idx_a() { return 1; }
int idx_b() { return 2; }
int idx_c() { return 3; }
int idx_d() { return 4; }
// state indices
int idx_x() { return 1; }
int idx_y() { return 2; }
// Lotka-Volterra ODEs
real[] LV_sys(real t, real[] u, real[] par, real[] real_data, int[] int_data) {
real du[2];
// use index functions instead of integer literals
du[idx_x()] = par[idx_a()] * u[idx_x()]
- par[idx_b()] * u[idx_x()] * u[idx_y()];
du[idx_y()] = par[idx_c()] * par[idx_b()] * u[idx_x()] * u[idx_y()]
- par[idx_d()] * u[idx_y()];
return du;
}
}
data {
int N;
real Times[N];
int Preys[N];
int Predators[N];
real K;
}
parameters {
// initial conditions
real<lower=0> x0;
real<lower=0> y0;
// parameters
real<lower=0> a;
real<lower=0> b;
real<lower=0, upper=1> c;
real<lower=0> d;
}
transformed parameters {
real par[4];
real u0[2];
// again use index functions to make a parameter array
par[idx_a()] = a;
par[idx_b()] = b;
par[idx_c()] = c;
par[idx_d()] = d;
// make an array for the initial condition
u0[idx_x()] = x0;
u0[idx_y()] = y0;
}
model {
// integrate the ODEs
real us[N, 2] = integrate_ode_rk45(LV_sys, u0, 0, Times, par, {0.0}, {0});
// priors on the parameters
x0 ~ normal(1, 1);
y0 ~ normal(1, 1);
a ~ normal(1, 1);
b ~ normal(1, 1);
c ~ beta(1, 1);
d ~ normal(1, 1);
// likelihood of the data
Preys ~ poisson(to_array_1d(to_vector(us[:, idx_x()]) * K));
Predators ~ poisson(to_array_1d(to_vector(us[:, idx_y()]) * K));
}
generated quantities {
// export the solution of the ODE
real us_hat[N, 2] = integrate_ode_rk45(LV_sys, u0, 0, Times, par, {0.0}, {0});
// and simulate noise
real us_sim[N, 2];
for ( i in 1:N ) {
for ( j in 1:2 ) {
us_sim[i, j] = poisson_rng(us_hat[i, j] * K);
}
}
}

Of course, this is still a low-dimensional model with a small number of parameters, but I found that even in a simple model, defining parameter indices in this way keeps everything concise.
I used the following Python script to generate the data and interface with Stan.

import numpy as np
import matplotlib.pyplot as plt
import pystan
from scipy.integrate import solve_ivp
from scipy.stats import poisson
## choose nice parameter values
a = 1
b = 0.2
c = 0.5
d = 0.5
## define the system
def LV_sys(t, u):
return [a*u[0] - b*u[0]*u[1], c*b*u[0]*u[1] - d*u[1]]
## observation times and initial conditions
N = 50
Times = np.linspace(1, 25, N)
x0 = 1
y0 = 1
u0 = [x0, y0]
K = 10
## generate random data
sol = solve_ivp(LV_sys, (0, max(Times)), u0, t_eval=Times)
Preys = [poisson.rvs(x*K) for x in sol.y[0]]
Predators = [poisson.rvs(x*K) for x in sol.y[1]]
## compile the Stan model
sm = pystan.StanModel(file="lotka-volterra.stan")
## prepare a data dictionary and initial parameter values for Stan
data_dict = {
'N' : N,
'Times' : Times,
'Preys' : Preys,
'Predators' : Predators,
'K' : K
}
def init_dict_gen():
return {
'a' : a,
'b' : b,
'c' : c,
'd' : d,
'x0' : x0,
'y0' : y0
}
## sample from posterior
sam = sm.sampling(data=data_dict, init=init_dict_gen, thin=10, chains=2, iter=5000)
## make a figure with data and fit
chain_dict = sam.extract(permuted=True)
fig, ax = plt.subplots(1, 1, figsize=(7,5))
ax.scatter(Times, Preys, color='tab:blue', edgecolors='k', zorder=2)
ax.scatter(Times, Predators, color='tab:orange', edgecolors='k', zorder=2)
pcts = [2.5, 97.5] ## percentiles
colors = ['tab:blue', 'tab:orange']
## plot trajectories
for j, color in enumerate(colors):
range_hat = [K*np.percentile(us, pcts) for us in chain_dict["us_hat"][:,:,j].T]
ax.fill_between(Times, *np.array(range_hat).T, color=color,
alpha=0.5, linewidth=0)
## plot simulations
for j, color in enumerate(colors):
range_sim = [np.percentile(us, pcts) for us in chain_dict["us_sim"][:,:,j].T]
ax.fill_between(Times, *np.array(range_sim).T, color=color,
alpha=0.3, linewidth=0)
ax.set_ylabel("Prey (blue), Predator (orange)\ndata and fit")
ax.set_xlabel("Time")
fig.savefig("LV-model-fit.png", bbox_inches='tight', dpi=200)
## plot parameter estimates
fig, ax = plt.subplots(1, 1, figsize=(7,3))
parnames = ["a", "b", "c", "d", "x0", "y0"]
real_par_vals = [a, b, c, d, x0, y0]
## make violinplots of estimates
pos = range(len(parnames))
ax.violinplot([chain_dict[x] for x in parnames], pos)
ax.set_xticks(pos)
ax.set_xticklabels(parnames)
## plot real parameter values
ax.scatter(pos, real_par_vals, color='k')
ax.set_ylabel("parameter estimate (blue)\nreal parameter value (black)")
ax.set_xlabel("parameter name")
fig.savefig("LV-model-estimates.png", bbox_inches='tight', dpi=200)

The following Figure show the parameter estimates together with the "real" parameter values

Saturday, 3 August 2019

Tracking Jupyter notebooks with Git

Recently, I came across a PLOS Ten Simple Rules paper about Jupyter notebooks. Rule number 6 is about version control and suggests the use of nbdime to merge notebooks, or saving the notebooks as python scripts and tracking those with your version control system. I experienced problems with using Git to track changes in Jupyter notebooks a while ago, and have been using the following solution.

For me, the largest nuisance is that figures are stored as very long strings in the output of cells. This makes it almost impossible to manually resolve conflicts while merging two branches. The solution is simple: just clear the output of the cells before committing the notebook. I'm doing this with a simple script (which I found somewhere on the Internet).

#!/usr/bin/env python
from __future__ import print_function
import json, os, sys
def main():
"""
Usage: ./clear_output_ipynb.py filename.ipynb
Output: filename.ipynb.cln
Script to clear all output from Jupyter notebooks.
"""
try:
inFileName = sys.argv[1]
outFileName = inFileName + ".cln"
except:
print("ERROR: no file name entered")
sys.exit(1)
with open(inFileName) as inFileHandle:
data = json.load(inFileHandle)
## remove output form code cells, set execution count to None
for n, cell in enumerate(data["cells"]):
if cell["cell_type"] == "code":
cell["execution_count"] = None
cell['outputs'] = []
## write cleaned data to file
with open(outFileName, 'w') as outFileHandle:
json.dump(data, outFileHandle, indent=2, sort_keys=True)
if __name__=='__main__':
main()

The script clear_output_ipynb.py lives in the same folder (called notebooks) as my Jupyter notebooks. I don't track changes in the .ipynb files, but have "clean" copies of the notebooks (with extension .ipynb.cln) that are part of the Git repository. To make life easy, I have two makefiles in my project folder called cln.makefile and nbs.makefile. Before I stage the changes in my notebooks, I first run
$ make -f cln.makefile
which runs the script clear_output_ipynb.py for each notebook in my notebooks folder.

NOTEBOOKS := $(wildcard notebooks/*.ipynb)
CLEAN_NOTEBOOKS := $(NOTEBOOKS:.ipynb=.ipynb.cln)
all: $(CLEAN_NOTEBOOKS)
%.ipynb.cln: %.ipynb
notebooks/clear_output_ipynb.py $<
view raw cln.makefile hosted with ❤ by GitHub

After I pull changes from a remote repository, or switch to another branch, I have to copy all .ipynb.cln files to .ipynb files. For this I have another makefile, and so I run
$ make -f nbs.makefile
before using and modifying the notebooks.

CLEAN_NOTEBOOKS := $(wildcard notebooks/*.ipynb.cln)
NOTEBOOKS := $(CLEAN_NOTEBOOKS:.ipynb.cln=.ipynb)
all: $(NOTEBOOKS)
%.ipynb: %.ipynb.cln
cp $< $@
view raw nbs.makefile hosted with ❤ by GitHub

Of course, sometimes I forget to clean the notebooks before committing, or I forget to make the .ipynb files. I've tried to automate the process of cleaning and copying with Git "hooks", but I have not been able to make that work. If somebody knows how, let me know!

Sunday, 21 July 2019

Neat encoding of censored data in Stan

Suppose that some of the observations in your data set are left- or right-censored. A way to handle such data in likelihood-based models is to integrate out the censored observations. In that case you have to replace the likelihood of an observation given the parameters with a cumulative likelihood. In Stan, you can replace a sampling statement as X ~ normal(mu, sigma) with target += normal_lcdf(X | mu, sigma) when X is in fact the upper bound of a left-censored observation, that is N(μ,σ2) distributed. For a right-censored observation you have to use the complementary cumulative distribution function normal_lccdf(X | mu, sigma).

A way to encode censoring in a Stan model such that all types of data can be treated equally is by using a custom probability distribution function censored_normal_lpdf that takes an additional argument cc that determines the type of censoring. Below we use the following codes:
Uncensored 0
Left-censored 1
Right-censored 2
Missing data 3

The function censored_normal_lpdf is defined in the functions of the Stan model below. In addition to N Observations, we add N CensorCodes that must be either 0, 1, 2, or 3 in the data block. In the model block, we now can use the sampling statement Observations[n] ~ censored_normal(mu, sigma, CensorCodes[n]), because this is just syntactic sugar for target += censored_normal_lpdf(Observations[n] | mu, sigma, CensorCodes[n]). Vectorization unfortunately does not work with this method.

functions {
real censored_normal_lpdf(real x, real mu, real sigma, int cc) {
real ll;
if ( cc == 0 ) { // uncensored
ll = normal_lpdf(x | mu, sigma);
} else if ( cc == 1 ) { // left-censored
ll = normal_lcdf(x | mu, sigma);
} else if ( cc == 2 ) { // right-censored
ll = normal_lccdf(x | mu, sigma);
} else if ( cc == 3 ) { // missing data
ll = 0.0;
} else { // any other censoring code is invalid
reject("invalid censoring code in censored_normal_lpdf");
}
return ll;
}
}
data {
int<lower=0> N;
real Observations[N];
int<lower=0, upper=3> CensorCodes[N];
}
parameters {
real mu;
real<lower=0> sigma;
}
model {
for ( n in 1:N ) {
Observations[n] ~ censored_normal(mu, sigma, CensorCodes[n]);
}
}

To demonstrate the censored_normal distribution, I added the following python script that generates some random data and compiles and runs the Stan model.

#! /usr/bin/python3
import numpy as np
import pystan
from scipy.stats import norm
## define the codes used for the type of censoring
uncensored_code = 0
left_censored_code = 1
right_censored_code = 2
missing_code = 3
## number of Observations
N = 200
## generate some (uncensored) data
UncensObs = norm.rvs(loc=0, scale=1, size=N)
## choose artificial "limits of detection"
LowerBound = -1
UpperBound = 2
## apply censoring accoring to the chosen bounds
def make_cens_obs(x):
if x < LowerBound:
return (LowerBound, left_censored_code)
elif x > UpperBound:
return (UpperBound, right_censored_code)
else:
return (x, uncensored_code)
ObsCensCodes = [make_cens_obs(x) for x in UncensObs]
## collect the data in a dictionary
data_dict = {
"N" : N,
"Observations" : [x[0] for x in ObsCensCodes],
"CensorCodes" : [x[1] for x in ObsCensCodes]
}
## compile the stan model
sm = pystan.StanModel(file="censored-normal.stan")
## sample from the posterior
sam = sm.sampling(data=data_dict)
chain_dict = sam.extract(permuted=True)
## look at the results
mu_est = np.mean(chain_dict["mu"])
mu_cri = np.percentile(chain_dict["mu"], [2.5, 97.5])
sigma_est = np.mean(chain_dict["sigma"])
sigma_cri = np.percentile(chain_dict["sigma"], [2.5, 97.5])
print(f"mu: {mu_est:0.3f}, 95% CrI: [{mu_cri[0]:0.3f}, {mu_cri[1]:0.3f}]")
print(f"sigma: {sigma_est:0.3f}, 95% CrI: [{sigma_cri[0]:0.3f}, {sigma_cri[1]:0.3f}]")

The output of the script will be something like
mu: -0.018, 95% CrI: [-0.176, 0.133]
sigma: 1.071, 95% CrI: [0.953, 1.203]

Saturday, 18 May 2019

A thread-safe global random number generator using C++ <random> and <mutex>

In a previous post, Sandro showed how to use the C++ <random> header to define a global random number generator (RNG). If at some point the user decides to parallelize their program, they would have to make the global RNG thread-safe. This requires only a small modification.

I have copied Sandro's code and added thread-safety using the C++ (with standard at least c++11) headers <thread> and <mutex>. In the header file thread_safe_random.hpp, the functions RANDOM and Seed are declared.

#ifndef _RND_HH_
#define _RND_HH_
void Seed(int seed);
double RANDOM();
#endif
The C++ file thread_safe_random.cpp defines the functions RANDOM and Seed, and the RNG and uniform distribution as before. Additionally, a mutex my_rng_mutex is defined to guard my_rng. I am using a lock_guard to lock and release the mutex. When one thread of execution calls the function RANDOM, it acquires the mutex. Any other thread that calls RANDOM, has to wait until the mutex is released.

#include <iostream>
#include <chrono>
#include <random> // requires flag --std=c++11 (or higher)
#include <mutex> // requires flag -pthread
#include "thread_safe_random.hpp"
std::mt19937_64 my_rng; // Defines an engine
std::uniform_real_distribution<double> my_unif_real_dist(0.0, 1.0); // Define distribution
std::mutex my_rng_mutex; // a mutex to guard my_rng
// This is the function to call if you want a random number in the interval [0,1)
double RANDOM() {
std::lock_guard<std::mutex> lock(my_rng_mutex);
return my_unif_real_dist(my_rng);
// mutex is released when lock goes out of scope
}
/* Function to seed the random number generator from main file
* This function again locks the mutex for when a thread decides
* to re-seed the RNG.
*/
void Seed(int seed) {
std::lock_guard<std::mutex> lock(my_rng_mutex);
my_rng.seed(seed);
// mutex is released when lock goes out of scope
}
In order to demonstrate thread_safe_random, I created max threads in the main function that use the auxiliary function fetch_random_number to call RANDOM.

#include <iostream>
#include <vector>
#include <thread>
#include "thread_safe_random.hpp"
// auxiliary function for the construction of std::thread
void fetch_random_number(double & x) {
x = RANDOM();
}
int main() {
int max = 10;
int my_seed = 235;
Seed(my_seed);
// a vector that will contain the threads
std::vector<std::thread> threads(max);
// a vector to store the results
std::vector<double> xs(max);
// create threads of execution that fetch a random number
for ( int i = 0; i < max; ++i ) {
// NB: xs[i] has to be wrapped in std::ref to pass a reference
threads[i] = std::thread(fetch_random_number, std::ref(xs[i]));
}
// synchonize and print the results
for ( int i = 0; i < max; ++i ) {
threads[i].join();
// when join() returns, xs[i] contains a fresh random number
std::cout << xs[i] << std::endl;
}
return 0;
}
view raw main.cpp hosted with ❤ by GitHub
The result should look like
$ g++ --std=c++11 -pthread main.cpp thread_safe_random.cpp -o test_safe_random
$ ./test_safe_random
0.284779
0.243487
0.161906
0.338338
0.235765
0.502853
0.389262
0.165401
0.244871
0.194046
However, the order of these numbers can change each time you execute the program. This means that the program is no longer deterministic (although we can argue about what it means to be deterministic or not), because the OS determines the order in which the threads call RANDOM. Another problem with this implementation is that it will be slow when each thread needs many random numbers.

Friday, 17 May 2019

Copying polymorphic C++ objects using an inherited dup() method

In order to copy polymorphic objects in C++, it can be convenient to equip the base and derived classes with a .dup() method (or .clone() method) that returns a pointer to a copy of the (derived) object. When you have a large amount of different derived classes, overriding the base class's .dup() method for each of them can be a bit of a nuisance. In order to solve this, I sometimes use an "intermediate" class template that can be inherited instead of the base class to provide the .dup() method. This solution is not perfect, because it does not provide the possibility of covariant return types.

The class template Cloneable is defined as follows:
#ifndef CLONEABLE_HPP_
#define CLONEABLE_HPP_
/* a class template that can be inherited by a Derived class
* in stead of the Base class, such that the Derived class
* automatically implements the correct dup() method
*/
template<class Base, class Derived>
class Cloneable : public Base {
public:
virtual ~Cloneable() { /* empty */ }
virtual Base* dup() const override {
return new Derived(*static_cast<const Derived*>(this));
}
};
#endif
view raw cloneable.hpp hosted with ❤ by GitHub

In the following code snippet, the use of the Cloneable is demonstrated:
/* Example demonstrating the Cloneable class template,
* which is defined in cloneable.hpp
* compile this file with e.g.:
* g++ --std=c++11 example.cpp -o example
*/
#include <iostream>
#include <list>
#include <cmath>
#include "cloneable.hpp"
// an abstract base class for a binary operation
class BinaryOp {
public:
virtual ~BinaryOp() { /* empty */ }
// a binary operation implements operator() taking 2 arguments
virtual double operator()(double x, double y) const = 0;
// the base class MUST declare the dup() method
virtual BinaryOp* dup() const = 0;
};
// some binary operations that (indirectly) inherit BinaryOp
class Sum : public Cloneable<BinaryOp, Sum> {
public:
double operator()(double x, double y) const override {
return x + y;
}
};
class Product : public Cloneable<BinaryOp, Product> {
public:
double operator()(double x, double y) const override {
return x * y;
}
};
class Hypotenuse : public Cloneable<BinaryOp, Hypotenuse> {
public:
double operator()(double x, double y) const override {
return sqrt(x*x + y*y); // or use the hypot function from <cmath>
}
};
int main() {
// make a list with 3 binary operations
std::list<BinaryOp*> ops = {new Sum, new Product, new Hypotenuse};
// define some arbitrary x and y
double x = 3; double y = 4;
// evaluate the binary operations
for ( auto op : ops ) {
std::cout << (*op)(x, y) << std::endl;
}
// make a copy of the obs list using the dup method
std::list<BinaryOp*> ops_copy;
for ( auto op : ops ) {
ops_copy.push_back(op->dup());
}
// evaluate the copied operations
for ( auto op : ops_copy ) {
std::cout << (*op)(x, y) << std::endl;
}
// clean up memory
for ( auto op : ops ) delete op;
for ( auto op : ops_copy ) delete op;
return 0;
}
view raw example.cpp hosted with ❤ by GitHub
If someone has a better way to do this, let me know.